Jasager and BackTrack
The beautiful part of using Jasager as opposed to airbase-ng for KARMA, is that by running karma as its own seperate module, we can keep the clutter out of BackTrack. So all the dhcp and karma stuff is taken care by Jasager running on fon, while BT can freely be used for sslstrip, hamster, middler and metasploit. The setup runs smooth and works great. So here is how you set it up:
Once you got Jasager running on fon, edit the /etc/config/dhcp and /etc/config/network files like this
dhcp:
option domainneeded 1
option boguspriv 1
option filterwin2k '0' #enable for dial on demand
option localise_queries 1
option local 'lan'
option domain 'lan'
option expandhosts 1
option nonegcache 0
option authoritative 1
option readethers 1
option leasefile '/tmp/dhcp.leases'
option resolvfile '/tmp/resolv.conf.auto'
config dhcp lan
option interface lan
option start 100
option limit 150
option leasetime 12h
option ignore 0
list dhcp_option 3,192.168.0.1
list dhcp_option 6,192.168.0.2,208.67.222.222
list dhcp_option 6,192.168.0.2,8.8.8.8
config dhcp wan
option interface wan
option start 100
option limit 150
option leasetime 12h
option ignore 1
list dhcp_option 3,192.168.0.1
list dhcp_option 6,192.168.0.2,208.67.222.222
list dhcp_option 6,192.168.0.2,8.8.8.8
Where 192.168.0.1 is the ip address of eth0 on backtrack. and 192.168.0.2 will be the ip address of fonera
Configure accordingly.
network:
option ifname lo
option proto static
option ipaddr 127.0.0.1
option netmask 255.0.0.0
config interface lan
option ifname eth0
option type bridge
option netmask 255.255.255.0
option proto static
option ipaddr 192.168.0.2
option gateway 192.168.0.1
option dns 8.8.8.8
Again, 192.168.0.1 is the ip address of eth0 on backtrack, while 192.168.0.2 is ip address of fonera
Once you have configured dhcp and network files, restart the networking on fonera or reboot it.
Now, we should configure backtrack machine to forward traffic to and from fonera
Issue these commands in backtrack.
echo '1' > /proc/sys/net/ipv4/ip_forward
iptables -X
iptables -F
iptables -A FORWARD -i wlan0 -o eth0 -s 192.168.0.0/24 -m state --state NEW -j ACCEPT
iptables -A FORWARD -m state --state ESTABLISHED,RELATED -j ACCEPT
iptables -A POSTROUTING -t nat -j MASQUERADE
route del default
route add default gw 192.168.1.254 wlan0
Where wlan0 is the interface that is connected to internet.
192.168.1.254 is the gateway for the interface connected to internet. Change it accordingly
If you are using your phone’s internet connection tethered to BT, then replace the above interface wlan0 with ppp0.
Gateway in that case will be the ip address of ppp0 , which can be found by ifconfig. Change accordingly.
Fon should now have internet and so are the clients connected to it. Now we can start our favorite tools on BT.
You can troubleshoot by pinging your way bottom up.
SSH into fonera, and ping
ping (The wlan0 IP address)
ping (The GW address)
ping 8.8.8.8
ping google.com
Tethering your phone to BackTrack
While on the go, being able to tether internet from your phone to your computer is a fantastic way to stay online. There are many programs to do that in windows, but it is not quite obvious while using BackTrack 4. Here is how you do it.
Modprobe the modules by issuing these commands:
modprobe ftdi_sio
modprobe cdc-acm
Now connect the phone in modem mode (not usb mass storage mode).
If you are using samsung phones, then this mode is called “samsung pc studio” mode. You need to check your phones user manual for the usb connect mode.
Once you connect your phone, depending upon which usbport you have connected to, it will appear as one of these following devices in /dev/ or /dev/usb folder:
ttyACM1
ttyACM2
ttyUSB0
ttyUSB1
ttyUSB2
You need to verify which one it is being mounted as by connecting and disconnecting and checking the /dev/ directory
Once connected, we need a ppp dialer.A good GUI dialer for kde is kppp. Install kppp
Once installed, it is found under KDEstart > Internet > KPPP
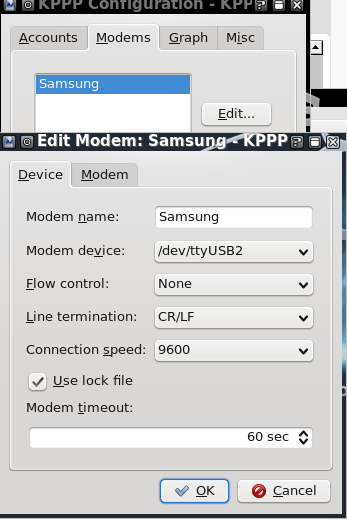
Launch it, and it needs to be configured,
Under modem tab, give it some name and select device accordingly and decrease the baud rate to 9600.
Everything else can be left at default
Under accounts tab, add new and input the dialing number accordingly. For att its *99#
Leave everything else at default
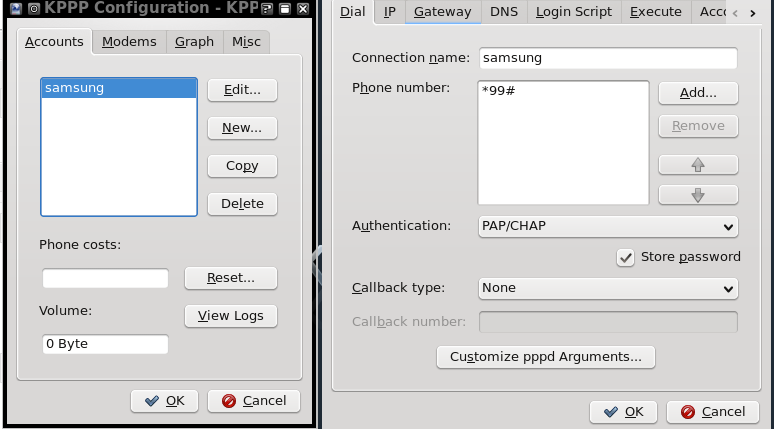
It ok under configuration windows, and connect. It should dial and connect to the phone.
If you receive error, try reducing the baud rate and try again.
You should have an ip, you can check by issuing ifconfig.
Thinkpad Battery controls on Backtrack
Thinkpad’s smapi needs to be installed and configured to control battery charge thresholds in order maintain good battery life. Here are the things that need to done on BackTrack 4 to set this up
Download tp_smapi from sourceforge
tar it and install it
cd tp_smapi-0.40
make
make install
Verify the installation by looking for kernal objects (.ko) in
kernel in above line should be your current active kernel version
Once installed you need to modprobe it to load it
Alternatively you can make it load during boot up by adding
to
or by adding it to user start up commands by adding these lines in
exit 0
To set the thresholds for starting and stopping battery charging (in percent of current full charge capacity):
echo 70 > /sys/devices/platform/smapi/BAT0/stop_charge_thresh
You can look at Thinkwiki for more usage
Scrolling with Thinkpad’s Trackpoint in BackTrack
One of the beautiful features of a Thinkpad : Scrolling using middle button and trackpoint, is missing out of the box on BackTrack 4. Here is how you enable it.
Based on Ubuntu bug 282387 , you need to patch xserver-xorg
add source repos for the /etc/apt/sources.list
deb-src http://us.archive.ubuntu.com/ubuntu/ intrepid main restricted
and then issue these commands to patch
cd /tmp
apt-get install build-essential git-core
apt-get build-dep xserver-xorg-input-evdev
git clone git://git.freedesktop.org/git/xorg/driver/xf86-input-evdev
cd xf86-input-evdev
git reset --hard 5f2c8a2dcdf98b39997ee5e7c9a9ace3b640bfa3
./autogen.sh --prefix=/usr
make
make install
Once its patched, you need to add entry in fdi policy
and paste this in there
<merge key="input.x11_options.EmulateWheel" type="string">true</merge>
<merge key="input.x11_options.EmulateWheelButton" type="string">2</merge>
<merge key="input.x11_options.XAxisMapping" type="string">6 7</merge>
<merge key="input.x11_options.YAxisMapping" type="string">4 5</merge>
<merge key="input.x11_options.ZAxisMapping" type="string">4 5</merge>
<merge key="input.x11_options.Emulate3Buttons" type="string">true</merge>
</match>
now reboot your machine and everything should be working.
You can further customize the trackpoint behavior by downloading and installing the trackpoint tool from here
It appears under System > Configure Trackpoint
Based on: This original post
Tunneling Web Traffic Via SSH
If you familiar with Linux and Unix environments you might be aware of SSH. In addition to connecting securely to the Unix machines via SSH, you can also tunnel all your web traffic via remote machine.
There are many SSH clients available for windows but, I will be demonstrating using PuTTY.

First, specify the address of your SSH server in the Session section. Select SSH for the Connection type and enter 22 for the Port (or whatever external internet port you are using to connect to your SSH server).
Next, go to Connection > SSH > Tunnels. There are three types of tunnels you can set up. For connecting to a UniX server with public IP, select Dynamic as the port type. et’s first set up a dynamic tunnel for port 1080. The port you use for a dynamic tunnel is actually arbitrary, but since port 1080 is often used for SOCKS proxies that’s what we’ll use. Type 1080 in the Source port field, select Dynamic as the port type, and then click the Add button.

Once you have everything configured for the connection, go back to the Session section and save your connection. Then click Open and log into your Linux box with your credentials as you normally would.
Now you have to configure your applications to use the tunnels you have set up. Let’s say you want to do your web browsing through the dynamic tunnel we set up. This is actually an extremely useful way to take advantage of SSH.
You may be on a network with some sort of firewall or content filtering that you wish to bypass. If you are able to get out on port 22 (or any other port, you’ll just have to set up your SSH server accordingly), then you’ll be able to surf wherever you want without issue through the dynamic tunnel.
It is also useful if you are surfing on a network where you may be concerned about others observing your traffic. Perhaps you are connecting from a hotel, a client site, or from work (you didn’t learn that from me) and you do not want others monitoring your traffic.
The best choice is to use Firefox, because Firefox allows you to configure the browser to also send DNS requests through the proxy. If you use Internet Explorer, your DNS requests are still made via the local network you connect from and thus can still be monitored. So Firefox would be the preferred browser if you wish to maintain privacy on the network you are connecting from.
To set up Firefox to use the dynamic tunnel as a SOCKS proxy, go to the Firefox Options > Advanced > Network and click the Settings… button. In the settings page, click Manual proxy configuration, enter localhost for the SOCKS Host, and 1080 for the Port.

We’re not quite done. We still need to configure Firefox to send DNS requests to the SOCKS proxy as well. To do this, enter about:config in the navigation bar in Firefox. You may get a prompt asking you if you know what you’re doing. Assure Firefox that you know what you’re doing and proceed.
Enter socks_remote_dns for the Filter and press enter. You should see a single option that says network.proxy.socks_remote_dns. If it says false for the Value, double-click on it so that it says true. You’re now all set. You should be able to surf the web through your new secure dynamic tunnel!
Source: http://www.makeuseof.com/tag/how-to-tunnel-traffic-with-ssh/